Water damage in ceilings presents a pervasive challenge for homeowners, often leading to costly repairs and extensive structural issues. Ignoring this type of damage can result in sagging ceilings, unsightly stains, and even potential ceiling collapses. The implications are not only aesthetic but can also pose safety hazards if the damage is severe.
This guide is designed to equip you with the necessary information and skills to effectively address and repair plaster ceilings that have suffered water damage. Whether you’re a DIY enthusiast or someone looking to understand the process before hiring a professional, this post covers all bases.
You will gain insights into assessing the damage, learn practical repair techniques, and discover preventive measures to safeguard your ceilings from future water damage. By the end of this guide, you should feel confident in tackling this common household issue.
What is Water Damage?
Water damage refers to various forms of harm caused by water intrusion, which can deteriorate building materials over time.
Signs of Water Damage in Plaster Ceilings
Detecting water damage early can save time, money, and prevent further deterioration. Here are some common signs to look out for:
Visible Sagging or Cracking: These indicate that the ceiling structure is compromised, which can lead to collapse if not addressed.
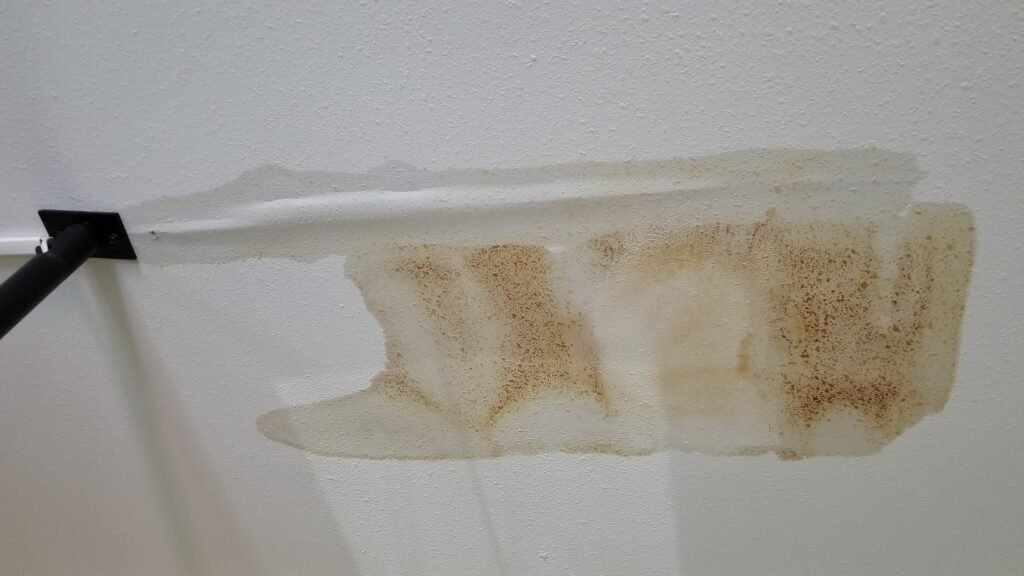
Discoloration or Staining: Yellowish or brownish stains are typical indicators of water infiltration. They often appear around the edges of the ceiling or in isolated spots.
Peeling Paint or Plaster: This can occur when the water has seeped into the paint or plaster layers, causing them to lose adhesion and peel off.

Initial Assessment
Step 1: Identify the Source of Water
Identifying the source of water intrusion is a crucial first step in the repair process. Without addressing the root cause, any repairs made will likely be temporary, and the problem could recur. Common sources of water damage in plaster ceilings include roof leaks, plumbing issues, or even high humidity levels leading to condensation.
Roof Leaks: Often caused by damaged shingles, flashing failures, or clogged gutters, roof leaks can allow water to seep into your home. During heavy rains, inspect your attic for signs of moisture or dripping water.
Plumbing Issues: Leaks from pipes running through the ceiling can be a major contributor to water damage. Check for any signs of dripping water or moisture around pipes and fittings, particularly those leading to upper floors or attics.
Condensation: In areas with high humidity, condensation can form on ductwork or metal components, eventually leading to water damage. Ensure your home is properly ventilated to reduce humidity levels.
Step 2: Evaluate the Extent of Damage
Evaluating the extent of the water damage is essential in planning your repair strategy. A thorough assessment helps in determining whether a DIY repair is feasible or if a professional’s expertise is necessary.
Tools and Techniques for Assessment:
Moisture Meter: This device helps in detecting moisture levels in materials, ensuring you identify all affected areas.
Thermal Imaging Cameras: These can reveal hidden moisture behind walls or ceilings by showing temperature differences, highlighting areas of concern.
Visual Inspection: Look for signs such as sagging, visible cracks, or mold growth. Use a flashlight to spot less obvious damage.
Sound Test: Gently tap the ceiling with a tool; a hollow sound may indicate areas where the plaster has detached from the lath.
When to Consult a Professional?
If the damage covers a large area or if the ceiling shows signs of structural damage, it’s advisable to consult a professional contractor. They have the expertise to assess and repair extensive damage safely.
In cases of black water damage or if mold is present, professional remediation may be necessary to ensure safety and compliance with health regulations.

Repair Process
Step 1: Prepare the Area
- Prioritize safety by wearing protective gear. Clear the area of furniture and cover any remaining items to protect them from dust and debris.
Step 2: Remove Damaged Plaster
- Carefully remove damaged plaster using a putty knife or scraper. Be cautious to avoid damaging the underlying structure.
Step 3: Repairing the Ceiling
- Patching Small Areas
- Gather materials such as joint compound and scrim tape. Follow step-by-step instructions to patch small cracks or holes.
- Replacing Larger Sections
- For significant damage, measure and cut new plasterboard to fit. Use appropriate techniques for skimming and finishing to ensure a seamless repair.
Step 4: Finishing Touches
- Once repairs are complete, prime and paint the area to match the existing ceiling.
Preventing Future Water Damage
Regular Maintenance Tips
- Regular inspections of roofing and plumbing systems help in early detection of leaks.
Improving Home Insulation and Ventilation
- Adequate insulation and ventilation can prevent moisture buildup, reducing the risk of damage.

FAQ - Repairing Plaster Ceilings from Water Damage
What causes water damage to plaster ceilings?
Water damage to plaster ceilings can be caused by a variety of factors, including roof leaks, plumbing issues, and condensation due to high humidity levels. It’s essential to identify and address the cause to prevent recurring damage.
How can I tell if my plaster ceiling has water damage?
Signs of water damage include visible sagging or cracking, discoloration or staining, and peeling paint or plaster. Regular inspections can help catch these signs early, allowing for timely repairs.
Can I repair a water-damaged plaster ceiling myself?
Yes, minor repairs can often be handled as a DIY project, especially if you have some experience with home repairs. However, for extensive damage or if you encounter black water damage or mold, it’s recommended to consult a professional.
What materials do I need to repair a plaster ceiling?
For small repairs, you’ll need materials such as joint compound, scrim tape, a plaster patch kit, and a trowel. Larger repairs may require plasterboard, screws, and additional tools for cutting and fitting.
When should I consult a professional for plaster ceiling repairs?
Consult a professional if the damage covers a large area, if there are structural concerns, or in cases of black water damage. Also, consider professional help if mold is present, as specialized remediation may be needed.
Is water damage to plaster ceilings covered by insurance?
Coverage varies by policy, but many insurance plans cover sudden and accidental water damage. It’s important to check your policy details to understand the specific coverage and any necessary documentation for claims.